
Sale!


Original price was: $293.00.$89.00Current price is: $89.00.
- Shop the Best Quality Online
- Shop with Zero Worries
- Risk-Free Shopping with Returns
- Hassle-Free Payments

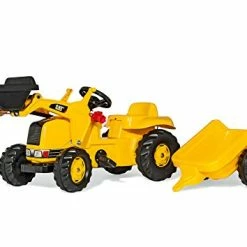
- Brand: ROLLY TOYS
- Material: Plastic
- Color: Yellow
- Cartoon Character: Tractor
- Educational Objective: play, Game
- Fully functional Front Loader is capable of scooping up large piles of dirt, sand or snow; Front hood compartment lifts for authenticity
- Tractor is pedal-powered, and no power system is required, the chain drive system is fully enclosed for safety; Oversized resin tires with long-lasting rubberized tread strips to ensure better traction
- Detachable hauling trailer is fillable if your children want to use the tractor to fill the trailer with the Front Loader; Trailer can also be used to move toys, comic books and other items
- High-impact blow molded resin body for superb style and durability; Two-position adjustable seat to be able to accommodate your children as they grow
- Recommended for children between ages three and six years old; Maximum weight capacity of 50 pounds on seat of tractor
3 reviews for Best deal ✔️ Rolly Toys CAT Construction Pedal Tractor: Front Loader Tractor With Detachable Trailer, Youth Ages 2.5+ , Yellow 🧨
Add a review
Related products
Sale!


Kids' Pedal Vehicles
Original price was: $297.00.$95.00Current price is: $95.00.
Sale!

Kids' Pedal Vehicles
Original price was: $114.39.$93.00Current price is: $93.00.
Sale!
![Best reviews of 😀 Batmobile Pedal Go Kart, Superhero Ride-On Batman Vehicle, Kids 4 And Older, Peddle & Patrol The Streets Of Gotham Just Like Batman, Race-Styled Pedals & Rubber Wheels [Amazon Exclusive] , Bl 🌟](https://www.childrentricyclesale.com/wp-content/uploads/2022/12/51odTJlwaYL-247x247.webp)

Original price was: $119.99.$88.00Current price is: $88.00.
Sale!

Kids' Pedal Vehicles
Original price was: $211.99.$82.00Current price is: $82.00.
Sale!

Original price was: $99.99.$82.00Current price is: $82.00.
Sale!
Kids' Pedal Vehicles
Original price was: $217.77.$94.00Current price is: $94.00.
Sale!
Kids' Pedal Vehicles
Original price was: $119.99.$87.00Current price is: $87.00.
Sale!
Kids' Pedal Vehicles
Original price was: $243.00.$99.00Current price is: $99.00.
R. Suarez –
Based on the written reviews, I expect to spend the 4 hours mentioned before or more. Well, it only took me 1.5 hours. 0.5 before going to tennis and another hour just now. Good amount of that time was also spent trying to figure out some of the parts, where they go and the stickers. The assembling just by looking at the pictures makes things more challenging. You just have to layout all the parts in an open space (I only had a 4×4 feet of space to work with so that made things more challenging).Note the read tires and the chain were already assembled. I wonder if the other reviewers describing hard to assemble didn’t get those parts already put together.My son still hasn’t seent it since I just finished assembling it. I can’t wait for his expression. I will try to post some pictures and maybe a video in the future. He has just turned 19 months but he is not in the short side so it might work. I just need to come up with a way to make something to push it until he gets his basics of pedaling down.—————————————-IMPORTANT, if you are leaving the stickers for the end, MAKE SURE you put the stickers for the hook prior to mounting the loader part or you will make things too complicated. The rest of the stickers can be put at the end.1) Mount the stearing wheel.2) Mount the two front tires.3) Assemble the loader part. All of it can be assembled before mounting it on the tractor.4) Mount the loader on the tractor, after you have already put the stickers on the hood.There is only one shaft holding the loader part to the tractor. You can unscrew it at will to make it easier to transport.
Maxwell’s Demon –
Our son loves this tractor! He drives lap after lap around the house and literally squeals with joy each time he dumps the contents of the scoop. Pedal power means no batteries & uses up some of his ample energy!The (German) engineering and material quality is great. As other reviewers have said, the only negative is instructions are far from simple and make it easy to do something irreversible in the wrong order. If you’d be happy doing something like changing a car’s starter motor then you’ll be fine; otherwise find someone else to put this together it for you.I ran though the whole assembly process without tightening any bolts and without hammering on the axle caps. That worked really well and saved a lot of time in the end.Top Tips: 1) The rear axle comes assembled. When you assemble the front and trailer axles *leave off one axle cap* until after you have assembled everything else. Put the caps on as the very last thing before the stickers. 2) The lump of plastic the front axle attaches to *cannot* be fitted once the wheels are in place so fit it first and then hammer on the axle caps. 3) The top-hat shaped plastic spacers for the trailer wheels are the serrated-edge ones not the smoother ones (the smooth ones are tools for supporting the axle caps when you tap them home) 4) The top-hat shaped plastic spacer used in the wheel end of the steering looks like one piece in the picture but actually is made up of the short plastic tube and one of the 4 plastic washers. 5) When you assemble the front and trailer axles *leave off one axle cap* until after you have assembled everything else. Put the caps on as the very last thing before the stickers. I know I said that already but its really important! :)Incidentally the ad says “Kettler” but if you are looking for a Rolly KID toys tractor this is one. (or at least the box ours arrived in was branded “Rolly” all over)
L. Cox –
The gift is great for our grandson. He has played with it constantly since we got it assembled. The instructions are in pictures only and the pictures are so small that it can be difficult to follow, but after 3 hours we finally got all the assembly completed. The stick ons that were included were cut incorrectly so we are having to contact the company to try and get a replacement sheet shipped. If you have problems with the instructions, get a millenial to help you since they seem to do better with picture instructions, or maybe just get a magnifying glass. Once get started on an install section (There are multiple sheets), it isn’t too bad…just take it in phases and you will get it completed. I was just glad it wasn’t Christmas eve and I was trying to get it ready by morning!